The SketchUp Workspace
Default SketchUp Template
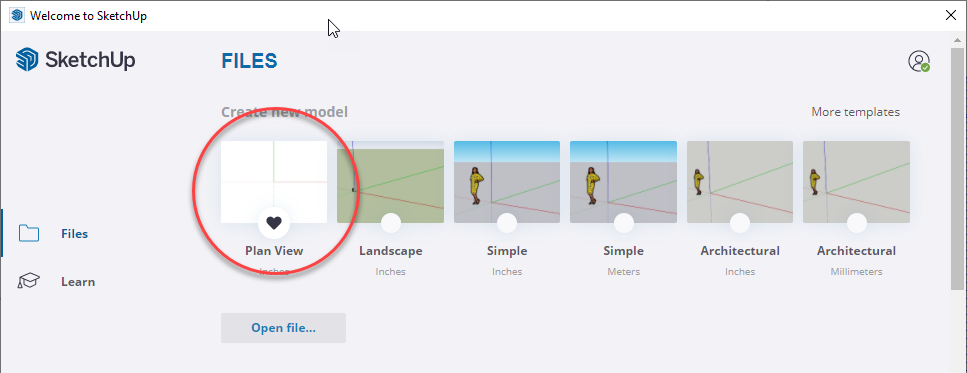
Your default template is the starting point for any SketchUp project. Pick SketchUp's simple "Plan View Inches" template as a starting point. I like this template because it has a clean white background, units are set to inches, and there is no scale figure.
Welcome to SketchUp
- Open SketchUp
- You should see the "Welcome to SketchUp" dialog. If not, click on the Help dropdown > Welcome to SketchUp... to open it manually.
- Click on the heart icon of the "Plan View Inches" template to set it as the default template. This will be the template that is loaded every time you start SketchUp, or start a new document.
- Now click on the "Plan View Inches" template thumbnail to start a new document using this template.
DIG DEEPER... A SketchUp template is nothing more than an empty SketchUp file, or .skp, that is opened every time you open SketchUp. Build your own powerful default template by following along with chapter 6 of "The SketchUp Workflow for Architecture".
Toolbars
Toolbars group and organize buttons that activate commands and tools in SketchUp. They are available for most default commands, like drawing and editing tools, and also for installed 3rd party extension. I prefer a clean screen, so I keep most toolbars closed while working and only open what I need on demand.
Accessing Toolbars
There are two ways to open toolbars.
- Right-click on any toolbar, then choose a toolbar to open from the list (PC only)
- Click on the View dropdown > Toolbars (Tool Palettes on a Mac), check on the toolbars to open
You can close toolbars in the same way, just uncheck the toolbar you wish to close.
I usually keep SketchUp's Large Tool Set open at all times. Some of the buttons come in handy, but most of them I have keyboard shortcuts for. This toolbar is most helpful for teaching, so keep it open until you finish the course and then decide.
HEADS UP! If you have multiple monitors and don't see the Toolbars you are trying to open within your SketchUp window, take a look around at your other screens.

Organize Your Screen
On a PC, you can dock the toolbars to organize your workspace.
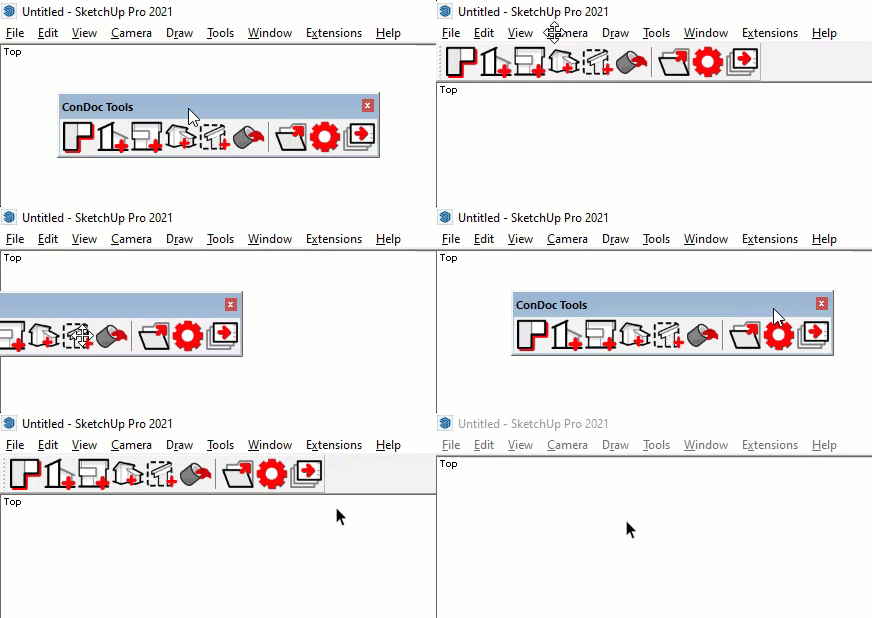
- Click and drag an undocked toolbar to the top, bottom, or side of the screen, or double-click on a toolbar name. The toolbar will lock itself to the SketchUp window.
- To undock a toolbar, click and drag the dotted line at the left of the toolbar, move it away from the perimeter of the SketchUp workspace, and release to place it where you want.
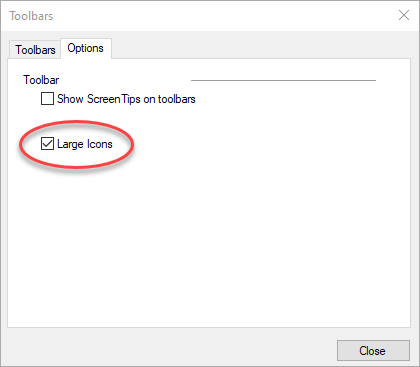
Maximize your 3D workspace by minimizing your toolbar footprint. Select View > Toolbars, then click on the Options tab, and check on Large Buttons to toggle the large icons on and off. I have big monitors with lots of pixels, so I actually prefer the large tool buttons turned on.
DIG DEEPER... Check out page 131 in "The SketchUp Workflow for Architecture".
Default Tray and Dialogs
All dialogs are available from the Window > Default tray drop-down menu. You can collapse any dialog by clicking on the window heading. Typically, it is best to keep open only the dialogs that you need regularly, such as Entity Info, Materials, Components, Styles, Layers, Scenes, and Shadows. The other dialogs are not used as often, so it is fine to open them on an as-needed basis.
You can pin the default tray so that it automatically collapses when not in use. I don't like this option because I have to hover on the tab to get it to appear again. This takes just long enough to be a nuisance.
I prefer to hide all the dialogs at once by clicking on the Window > Default Tray drop-down menu and choosing Hide Tray. Unhide them by going to the same menu and choosing Show Tray. Consider adding a keyboard shortcut for hiding the tray.
DIG DEEPER... Check out page 133 in "The SketchUp Workflow for Architecture".
HEADS UP! SketchUp's tray system is only available on the PC version.
System Preferences
SketchUp has additional settings you can use to tweak your system and make it more streamlined and efficient. Use the Preferences dialog to adjust these settings. System preferences do not travel with the model; they are local SketchUp settings that are the same for every model you open. You will need to adjust these settings on every computer you work on.
To access system preferences, click on the Window (SketchUp on a Mac) drop-down menu and choose Preferences. The only preferences covered in this lesson are the ones that make a difference.
Drawing
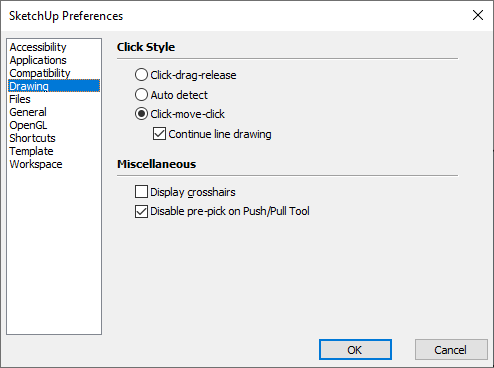
The easiest way to draw in SketchUp is to use a three-button, scroll wheel mouse utilizing click-move-click. SketchUp’s default settings provide both the click-drag-release and click-move-click style of drawing. Change the Drawing settings to allow only Click-move-click and Continue line drawing. This will prevent you from clicking and dragging, which makes it easy to accidentally move objects by tiny increments or accidentally draw tiny, almost unnoticeable unwanted geometry. Drawing style is a personal preference, so feel free to adjust to the one that works for you.
General
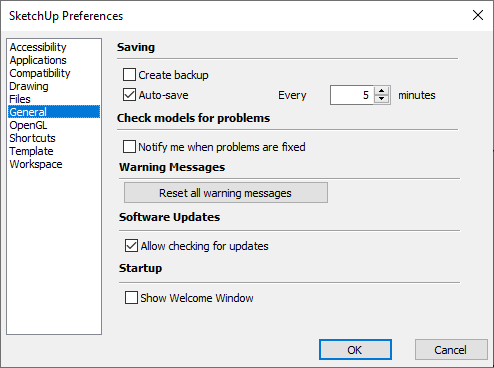
Within the General settings, make sure the Auto-save box is checked, and allow SketchUp to automatically save your model every 5 minutes. Auto-saving can take a long time if your model is large; however, by applying the model lightening techniques explained in this book, you will minimize that problem.
Creating a backup file is pretty much a necessity—just in case! A backup file is saved in the same folder as the original .skp file and given the extension .skb. In the rare event that a model becomes unusable, change the file extension of the backup from .skb to .skp, and you will be able to open the file in SketchUp. If you use a cloud file storage service (ie. Dropbox, Workdrive, Onedrive) you don't need to create the .skb. These services offer version histrory.
HEADS UP! SketchUp will not auto-save a new model until you have first saved it yourself.
Shortcuts
Keyboard shortcuts allow you to access any SketchUp command with the press of a key. Use shortcuts to help you work faster and relieve a huge amount of strain on your eyes and mouse hand. Every time you take your eyes off your design, you slow down. Take the time to focus on your keyboarding technique and set up your own custom keyboard shortcuts.
Adding Shortcuts
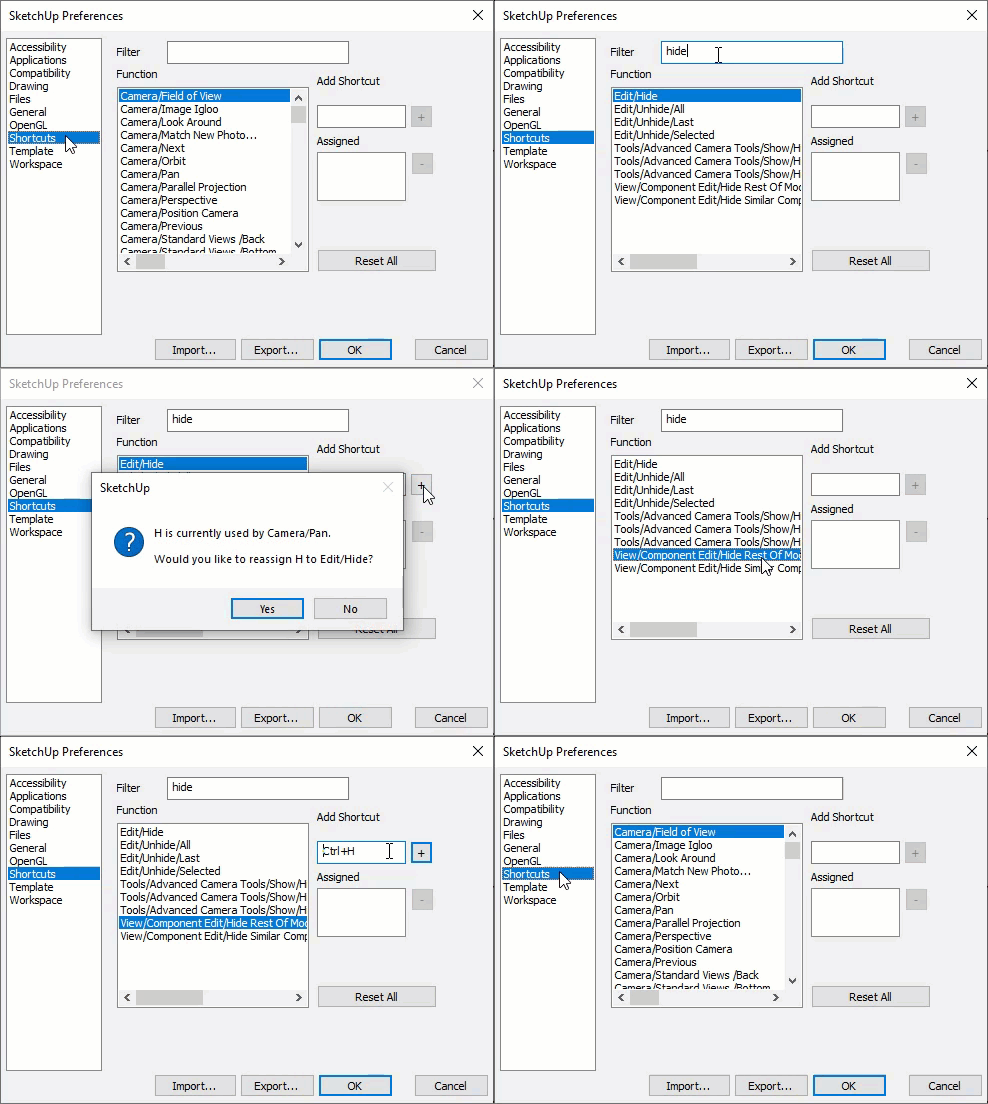
Modify your keyboard shortcuts in the Preferences dialog box by clicking on the Window (SketchUp on a Mac) drop-down menu and choosing Preferences > Shortcuts
- Type a command, such as Hide, into the Filter window to parse through all the options and quickly find a command.
- Click on a command in the Function box—for example, Edit/Hide.
- Click in the Add Shortcut box and press the H key.
- Click on the plus sign (+) to lock in the assigned keyboard shortcut.
Now that you’ve assigned the keyboard shortcut H to the command Hide Geometry, the H key is taken; however, several helpful hide commands are left unassigned. You may have trouble remembering them if they don’t have an “H” associated with them. Fortunately, you can use combinations of modifier keys—Ctrl, Shift, and Alt—to add more shortcut options in the Add Shortcut text box. To assign a modifier key to a shortcut command, simply press and hold the modifier key while you enter the desired key in the text box. For example, to hide the rest of the model when you’re editing a group or component, assign the keyboard shortcut Ctrl+H.
DIG DEEPER... Check out page 139 in "The SketchUp Workflow for Architecture" to add more helpful shortcuts, and learn how to export and import preferences to get your other computers set up quickly.
Instruction
No class files are needed to follow along...
